Saturday, November 22, 2008

Resolving transparent PNG bug in Internet Explorer 6 and below

Internet Explorer 6 and below has bug in displaying transparent PNG files correctly. To resolve this issue, there is a great fix made by Angus Turnbull. You can find the details in his website.

Here are some steps (I copy and paste it from his website) you should do to implement this fix :

First, download and extract the files in the website above. Here is the direct link. The file name is iepngfix.zip .


Second, copy and paste iepngfix.htc and blank.gif to your website folder.


Third, change the relative URL of the blank.gif image in iepngfix.htc from

if (typeof blankImg == 'undefined') var blankImg = 'blank.gif';

to the relative URL of your blank.gif image (for example : if you place it under a folder named : images ), then you should change the code to this :

if (typeof blankImg == 'undefined') var blankImg = '/images/blank.gif';


Fourth, edit your CSS where you place your PNG files for example from this:

<style type="text/css"> 
.myPNGBackground {
     background-image:url('/images/mybackground.png'); }   

</style>

to this (I assume my iepngfix.htc file is on my website root folder). Add the behavior properties with the value url of your iepngfix.htc file.

<style type="text/css"> 
.myPNGBackground {
     background-image:url('/images/mybackground.png');
    
behavior: url('/iepngfix.htc') }
</style>

IMO this is the easiest way to apply the PNG fix. All the credit should go to Angus Turnbull. Great job.

Get More Detail in SharePoint's "An Unexpected Error Has Occurred"

When you develop on SharePoint, you may often get this annoying error "An unexpected error has occurred" without knowing what is causing your errors.

sperror

To get more detail what errors you get, you have to do a few things in your web.config of your SharePoint site.
First, change the default settings attribute CallStack from SafeMode tag from false to true

<SafeMode CallStack="true" ...

Second, change the default settings attribute mode from customErrors tag from on to off

<customErrors mode="Off" />

After that, SharePoint should give you specific error message if you encounter errors.

I get this great tips from this blog . You can find more details there.

All the credits should go to the original poster.

Saturday, November 15, 2008

Get and Manipulate Temporary Internet Explorer Files using C# .NET Code

 
Recently, I want to access my temporary Internet Explorer files based on some filter (for example: get all jpg files which are downloaded from http://www.google.com or get all pdf files which are downloaded from  http://www.yahoo.com)  and get their absolute path in order to copy them to another folder. I hardly found articles that can help me to do it. Usually they don't solve all my problem. Most of all articles gives code about deleting temporary Internet Explorer files , not getting and manipulating it. After googling a few hours, I found some articles that (although not completely) solve my problems.

First , article from this blog http://blog.datalisto.com/2008/08/accessing-contents-of-ie-cache.html gives a solution about how to convert url like http://www.google.com/images/nav_logo3.png to its actual path C:\Documents and Settings\agoesz\Local Settings\Temporary Internet Files\Content.IE5\FMGZR189\nav_logo3[1].png using GetUrlCacheEntryInfo method from Wininet.dll assembly. This article also help you to understand how Internet Explorer store its temporary files.

Second, articles from this blog http://omnicode.blogspot.com/2008/04/extract-urls-from-internet-explorerie.html gives a solution (this is the code : http://omniware.googlepages.com/getIEhistory.html ) about how to enumerate / list all the history in our Temporary Internet Explorer folder.

I combine this two solution to solve my problem.

Here are the code. This code is done using C# on Console Application.

using System;
using System.Collections.Generic;
using System.Text;
using System.IO;
using System.Runtime.InteropServices;

using FILETIME = System.Runtime.InteropServices.ComTypes.FILETIME;
namespace ConsoleApplication1
{
class Program
{

#region Get Files URL From Cache
//Declare the WIN32 API calls to get the entries from IE's history cache
[DllImport("wininet.dll", SetLastError = true)]
public static extern IntPtr FindFirstUrlCacheEntry(string lpszUrlSearchPattern, IntPtr lpFirstCacheEntryInfo, out UInt32 lpdwFirstCacheEntryInfoBufferSize);

[DllImport("wininet.dll", SetLastError = true)]
public static extern long FindNextUrlCacheEntry(IntPtr hEnumHandle, IntPtr lpNextCacheEntryInfo, out UInt32 lpdwNextCacheEntryInfoBufferSize);

[DllImport("wininet.dll", SetLastError = true)]
public static extern long FindCloseUrlCache(IntPtr hEnumHandle);

[DllImport("Wininet.dll", SetLastError = true, CharSet = CharSet.Auto)]
public static extern Boolean GetUrlCacheEntryInfo(String lpxaUrlName, IntPtr lpCacheEntryInfo, ref int lpdwCacheEntryInfoBufferSize);
[StructLayout(LayoutKind.Sequential)]
public struct INTERNET_CACHE_ENTRY_INFO
{
public UInt32 dwStructSize;
public string lpszSourceUrlName;
public string lpszLocalFileName;
public UInt32 CacheEntryType;
public UInt32 dwUseCount;
public UInt32 dwHitRate;
public UInt32 dwSizeLow;
public UInt32 dwSizeHigh;
public FILETIME LastModifiedTime;
public FILETIME ExpireTime;
public FILETIME LastAccessTime;
public FILETIME LastSyncTime;
public IntPtr lpHeaderInfo;
public UInt32 dwHeaderInfoSize;
public string lpszFileExtension;
public UInt32 dwExemptDelta;
};

public static class Hresults
{
public const int ERROR_SUCCESS = 0;
public const int ERROR_FILE_NOT_FOUND = 2;
public const int ERROR_ACCESS_DENIED = 5;
public const int ERROR_INSUFFICIENT_BUFFER = 122;
public const int ERROR_NO_MORE_ITEMS = 259;
};
//private static void getUrlEntriesInHistory(TextWriter writer)
private static List<string> getUrlEntriesInHistory(string sourceUrlFilter, string fileExtensionFilter)
{
List<string> filesList = new List<string>();
IntPtr buffer = IntPtr.Zero;
UInt32 structSize;
const string urlPattern = "Visited:";

//This call will fail but returns the size required in structSize
//to allocate necessary buffer
IntPtr hEnum = FindFirstUrlCacheEntry(null, buffer, out structSize);
try
{
if (hEnum == IntPtr.Zero)
{
int lastError = Marshal.GetLastWin32Error();
if (lastError == Hresults.ERROR_INSUFFICIENT_BUFFER)
{
//Allocate buffer
buffer = Marshal.AllocHGlobal((int)structSize);
//Call again, this time it should succeed
//hEnum = FindFirstUrlCacheEntry(urlPattern, buffer, out structSize);
hEnum = FindFirstUrlCacheEntry(null, buffer, out structSize);
}
else if (lastError == Hresults.ERROR_NO_MORE_ITEMS)
{
Console.Error.WriteLine("No entries in IE's history cache");
//return;
return filesList;
}
else if (lastError != Hresults.ERROR_SUCCESS)
{
Console.Error.WriteLine("Unable to fetch entries from IE's history cache");
//return;
return filesList;
}
}


INTERNET_CACHE_ENTRY_INFO result = (INTERNET_CACHE_ENTRY_INFO)Marshal.PtrToStructure(buffer, typeof(INTERNET_CACHE_ENTRY_INFO));
//writer.WriteLine(result.lpszSourceUrlName);
string fileUrl = result.lpszSourceUrlName.Substring(result.lpszSourceUrlName.LastIndexOf('@') + 1);
if (fileUrl.Contains(sourceUrlFilter) && fileUrl.EndsWith(fileExtensionFilter))
{
//Console.WriteLine(fileUrl);
filesList.Add(fileUrl);
}


// Free the buffer
if (buffer != IntPtr.Zero)
{
try { Marshal.FreeHGlobal(buffer); }
catch { }
buffer = IntPtr.Zero;
structSize = 0;
}

//Loop through all entries, attempt to find matches
while (true)
{
long nextResult = FindNextUrlCacheEntry(hEnum, buffer, out structSize);
if (nextResult != 1) //TRUE
{
int lastError = Marshal.GetLastWin32Error();
if (lastError == Hresults.ERROR_INSUFFICIENT_BUFFER)
{
buffer = Marshal.AllocHGlobal((int)structSize);
nextResult = FindNextUrlCacheEntry(hEnum, buffer, out structSize);
}
else if (lastError == Hresults.ERROR_NO_MORE_ITEMS)
{
break;
}
}

result = (INTERNET_CACHE_ENTRY_INFO)Marshal.PtrToStructure(buffer, typeof(INTERNET_CACHE_ENTRY_INFO));
//writer.WriteLine(result.lpszSourceUrlName);
fileUrl = result.lpszSourceUrlName.Substring(result.lpszSourceUrlName.LastIndexOf('@') + 1);
if (fileUrl.Contains(sourceUrlFilter) && fileUrl.EndsWith(fileExtensionFilter))
{
//Console.WriteLine(fileUrl);
filesList.Add(fileUrl);
}


if (buffer != IntPtr.Zero)
{
try { Marshal.FreeHGlobal(buffer); }
catch { }
buffer = IntPtr.Zero;
structSize = 0;
}
}
}
finally
{
if (hEnum != IntPtr.Zero)
{
FindCloseUrlCache(hEnum);
}
if (buffer != IntPtr.Zero)
{
try { Marshal.FreeHGlobal(buffer); }
catch { }
}
}
return filesList;
}

#endregion

const int ERROR_FILE_NOT_FOUND = 2;
#region Convert Files URL to Actual Directory URL
struct LPINTERNET_CACHE_ENTRY_INFO
{
public int dwStructSize;
IntPtr lpszSourceUrlName;
public IntPtr lpszLocalFileName;
int CacheEntryType;
int dwUseCount;
int dwHitRate;
int dwSizeLow;
int dwSizeHigh;
FILETIME LastModifiedTime;
FILETIME Expiretime;
FILETIME LastAccessTime;
FILETIME LastSyncTime;
IntPtr lpHeaderInfo;
int dwheaderInfoSize;
IntPtr lpszFileExtension;
int dwEemptDelta;
}
private static string GetPathForCachedFile(string fileUrl)
{
int cacheEntryInfoBufferSize = 0;
IntPtr cacheEntryInfoBuffer = IntPtr.Zero;
int lastError; Boolean result;
try
{
// call to see how big the buffer needs to be
result = GetUrlCacheEntryInfo(fileUrl, IntPtr.Zero, ref cacheEntryInfoBufferSize);
lastError = Marshal.GetLastWin32Error();
if (result == false)
{
if (lastError == ERROR_FILE_NOT_FOUND) return null;
}
// allocate the necessary amount of memory
cacheEntryInfoBuffer = Marshal.AllocHGlobal(cacheEntryInfoBufferSize);

// make call again with properly sized buffer
result = GetUrlCacheEntryInfo(fileUrl, cacheEntryInfoBuffer, ref cacheEntryInfoBufferSize);
lastError = Marshal.GetLastWin32Error();
if (result == true)
{
Object strObj = Marshal.PtrToStructure(cacheEntryInfoBuffer, typeof(LPINTERNET_CACHE_ENTRY_INFO));
LPINTERNET_CACHE_ENTRY_INFO internetCacheEntry = (LPINTERNET_CACHE_ENTRY_INFO)strObj;
//INTERNET_CACHE_ENTRY_INFO internetCacheEntry = (INTERNET_CACHE_ENTRY_INFO)strObj;
String localFileName = Marshal.PtrToStringAuto(internetCacheEntry.lpszLocalFileName); return localFileName;
}
else return null;// file not found
}
finally
{
if (!cacheEntryInfoBuffer.Equals(IntPtr.Zero)) Marshal.FreeHGlobal(cacheEntryInfoBuffer);
}
}
#endregion

[STAThread]
static void Main(string[] args)
{
string urlFilter = "http://www.google.com";
string fileExtensionFilter = "png";

List<string> myFiles = getUrlEntriesInHistory(urlFilter, fileExtensionFilter);
foreach (string actualPathName in myFiles)
{
string realPath = GetPathForCachedFile(actualPathName);
Console.WriteLine("actualPathName : " + actualPathName);
Console.WriteLine("realPath : " + realPath);
}

}


}
}


Here is the screenshot of the result in my computer :


screenshot


after you get the absolute path, you can manipulate it as you wish, such as moving it to another folder etc


Note:

I know this code is not well-tested and may be not efficient, there are two struct defined with almost same content,just different data type. Use it at your own risk. It works on my machine. But it may be not working in yours. I just combine the codes from above sites and it worked. It's enough for me :) If you have another solution better than this. Please let me know. Hope it helps.

Friday, October 24, 2008

Connect Internet Using GPRS and O2 XDA Atom as Modem

Here are good resources if you want to connect internet using GPRS and O2 XDA Atom as your modem (plus using Indosat as your Operator in Indonesia):
- http://forum.xda-developers.com/showthread.php?t=274581
- http://www.theunwired.net/?item=how-to-setting-up-a-gprs-connection-for-win-xp-and-usb-using-o2-xda-ii&category=09-pocket-pc-tutorials
- http://patronaze.multiply.com/journal/item/6/Setting_Modem_GPRS_Mentari
- http://efhape.web.ugm.ac.id/?p=16

Yahoo Messenger on your mobile phone using Yamee

I've been using Yahoo Messenger for chatting with my friends, working partners, and families. If no internet connection is present, you can try using it on your mobile phones. There are a few options such as Yamee, YmTiny, YaGo, eBuddy, etc. I haven't tried them all. The only one I tried is Yamee. And IMO so far Yamee is the best and free yahoo messenger application for mobile phone. You can download Yamee (the latest version I used is version 1.3) in here .

I have tried it on several phones, such as Nokia 6270 (GSM), Sony Ericsson K750i (GSM), and Nokia 2865 (CDMA) and it worked perfectly. Yamee supports a lot of mobile phones. You can check it on the above link. Here is the screenshot I captured from above link.

15494

For GPRS connection settings in Indonesia, you can check these links :
- http://blog.compactbyte.com/2004/06/15/cara-mudah-setting-gprs-wap-dan-mms-untuk-semua-ponsel
- http://www.terkapar.com/home/cara-setting-wap-gprs.html
- http://info.cakrawala21.com/?p=9
- http://ilhabib.wordpress.com/2008/04/21/setting-gprs/

Indonesian Operators GPRS tariff ( XL, Telkomsel , Indosat , Axis):
- http://sangpengampun.blogspot.com/2008/07/tarif-gprs-telkomsel-turun-xl-jadi-juru.html

Currently, AFAIK, the cheapest GPRS tariff is AXIS, the most expensive is XL.

Friday, September 26, 2008

All About GridView

I found nice article about gridview. It explains about how to use a gridview control in depth, such as loading , editing, canceling edit, selecting row, updating row, and paging in a gridview. The code is simple and easy to understand. You can find it here.

Read Weather Forecast From Indonesia's BMG in .NET code (C#)


If you want to know weather forecast in Indonesia, you can use the data from BMG (Badan Meteorologi dan Geofisika). BMG provides the data in two types, today and tomorrow's weather forecast. All data is saved in an XML file and located on http://www.bmg.go.id/dataxml/ . Today's weather forecast is provided on a file named cuaca_indo_1.xml , whereas tomorrow's forecast on cuaca_indo_2.xml . It's up to you to use which files.

Here are the sample code to read the XML files in .NET (C#)

using System;
using System.Data;
using System.Configuration;
using System.Collections;
using System.Web;
using System.Web.Security;
using System.Web.UI;
using System.Web.UI.WebControls;
using System.Web.UI.WebControls.WebParts;
using System.Web.UI.HtmlControls;
using System.Xml;
using System.Xml.XPath;
using System.Collections.Generic;

public partial class UC_AllWeather : System.Web.UI.UserControl
{
List<MyWeather> weathers = new List<MyWeather>();
protected void Page_Load(object sender, EventArgs e)
{
LoadBmgXml();
GridView1.DataSource = weathers;
GridView1.DataBind();
}
private void LoadBmgXml()
{
try
{
XmlDocument doc = new XmlDocument();
doc.Load("http://www.bmg.go.id/dataxml/cuaca_indo_1.xml");
XPathNavigator root = doc.CreateNavigator();
XPathNodeIterator nodes = root.Select("/Cuaca/Isi/Row");
while (nodes.MoveNext())
{
string city = nodes.Current.SelectSingleNode("Kota").Value;
string weatherCondition = nodes.Current.SelectSingleNode("Cuaca").Value;
string minimumTemperature = nodes.Current.SelectSingleNode("SuhuMin").Value;
string maximumTemperature = nodes.Current.SelectSingleNode("SuhuMax").Value;
string minimumMoisture = nodes.Current.SelectSingleNode("KelembapanMin").Value;
string maximumMoisture = nodes.Current.SelectSingleNode("KelembapanMax").Value;
weathers.Add(new MyWeather(city,weatherCondition,minimumTemperature,maximumTemperature,minimumMoisture,maximumMoisture));

}
}
catch (Exception ex)
{

Response.Write(ex.Message);
}
}
public class MyWeather
{
private string _city;

public string City
{
get { return _city; }
set { _city = value; }
}

private string _weatherCondition;

public string WeatherCondition
{
get { return _weatherCondition; }
set { _weatherCondition = value; }
}

private string _minTemp;

public string MinimumTemperature
{
get { return _minTemp; }
set { _minTemp = value; }
}

private string _maxTemp;

public string MaximumTemperature
{
get { return _maxTemp; }
set { _maxTemp = value; }
}

private string _minMoisture;

public string MinimumMoisture
{
get { return _minMoisture; }
set { _minMoisture = value; }
}

private string _maxMoisture;

public string MaximumMoisture
{
get { return _maxMoisture; }
set { _maxMoisture = value; }
}


public MyWeather()
{

}
public MyWeather(string city,string weatherCondition,
string minimumTemperature,string maximumTemperature,
string minimumMoisture,string maximumMoisture)
{
this.City = city;
this.WeatherCondition = weatherCondition;
this.MinimumTemperature = minimumTemperature;
this.MaximumTemperature = maximumTemperature;
this.MinimumMoisture = minimumMoisture;
this.MaximumMoisture = maximumMoisture;
}
}
}

The idea reading the XML files provided by BMG actually comes from this blog . The article shows you how to read the XML in PHP, I modified it to .NET code (C#). All the credit of this goes to the original poster. Hope it helps.

Tuesday, July 22, 2008

Send Email .NET code using Gmail SMTP

To send email, we need a SMTP server and Google has provided it for free :) Just use this code to send email using your Gmail account.

public static void SendMail()

        {

            //Builed The MSG 

            System.Net.Mail.MailMessage msg = new System.Net.Mail.MailMessage();

            msg.To.Add("agus.santoso@plasmedia.com");           

            msg.From = new MailAddress("youremail@gmail.com", "Your Name",System.Text.Encoding.UTF8);

            msg.Subject = "Test mail using .net2.0";

            msg.SubjectEncoding = System.Text.Encoding.UTF8;

            msg.Body = "This is my msg Body";

            msg.BodyEncoding = System.Text.Encoding.UTF8;

            msg.IsBodyHtml = false;

            msg.Priority = MailPriority.High;           


            //Add the Creddentials 

            SmtpClient client = new SmtpClient();

            client.Credentials = new System.Net.NetworkCredential("youremail@gmail.com", "your password");

            client.Port = 587; 

            client.Host = "smtp.gmail.com";

            client.EnableSsl = true;

            object userState=msg;

            try

            {

                client.Send(msg);

                Console.WriteLine("success");

            }

            catch (System.Net.Mail.SmtpException ex)

            {

              Console.WriteLine("Send Mail Error");

            }

        }

Monday, July 21, 2008

SharePoint Document Library TreeView Browser WebPart

SharePoint have a nice way to organize your files in document library by using folders, just like Windows Explorer does. But it lacks one important feature, the treeview browser. That's what I need in my last project requested by my client. I found great SharePoint Document Library TreeView Browser WebPart, called SharePoint Stramit Document Library browser , made by Renaud Comte, Microsoft MVP. And the best part, it's free :) You could see the source code given by Renaud Comte too in the CodePlex.

There are 3 kinds of treeview here (the description quoted from CodePlex):
1. Static TreeView ,a simple TreeView WP load in one shot the document library hierachy
2. Dynamic TreeView, for large library, the loading append when you open a folder
3. Multiple TreeView, This WebPart load automatically all the document library on your local WSS site. It's a derived version of the dynamic treeview, so not big problem if there some huge lists.

To use it, just use stsadm.exe utility (read Sean Chase tutorial here, see point 22). Here are some screenshots from the CodePlex. All the credits go to Renaud Comte. Cool and great job!

Tree1

Tree4

MultipleTV

SharePoint Polling WebPart

I just found a great Polling WebPart from Phil Wicklund. You can find it in CodePlex or in his personal site to check for working examples, screenshots etc. It works great in my last project. There are some restrictions (in current release), like the poll submitter can submit twice/ more and max 5 poll questions / answers. But it can be customized according to our requirements. Phil has given the source code too. Just download it from CodePlex. In order to use it, just use the stsadm.exe command tool (read this tutorial by liedong). All the credit goes to Phil Wicklund. Great Job!

Here are some screenshots taken from Phil's website.

Thursday, June 19, 2008

Fish & Co Buy 1 Get 1 Free Promotion June 2008

FYI , Fish & Co Jakarta have a promotion in June 2008 Buy 1 Get 1 Free for Fish n Chips menu. The details can be seen in this Prambors news or the picture below.

fishnco

Today, my honey and I have tried this promotion in Fish n Co Mall Taman Anggrek. We ordered 2 Fish n Chips (with rice/ chips) for Rp 55.000, 1 Ice Blackcurrant Tea (free flow) for Rp 19.000, and 1 Ice Lemon Tea (free flow) for Rp 19.000 (excluding 10% tax and 5,5% service charge). The fish meat was big enough and delicious. It's rather expensive (I spent Rp 108.000) but really worth it :)

If you want to try this promotion, don't forget it will last until the end of June 2008 only :)

Wednesday, June 18, 2008

Install Apache, Mysql, PHP, and PHPMyAdmin Tutorial

I found a good article to install apache, mysql, PHP, and PHPMyAdmin in this Install Apache PHP MySQL and phpMyAdmin on Windows article

You can follow the instructions there. And don't forget to copy all of your PHP extensions DLL in C:\php\ext directory (if you follow the tutorial completely, the directory may be different if you customize it)

If you want to customize the settings, such as listening in another port (default is 80) or placing the *.php files in C:\PHP, you can check this Install Apache PHP MySQL article

Tuesday, June 17, 2008

Printing a Web Page

I found a useful article to print a web page. The fastest and simplest solution is using javascript window.print()

<input type="button" value="Print" onclick="window.print();">

If you click this button , it will show this print dialog

printdialog

This example will print the entire web page,including the print button and anything else. To get better result, we can make two versions of web page, one for showing on screen and the other one for printing

On Screen 1
===========
<input type="button" value="Print" onclick="window.open("Print.aspx");">

On Screen 2 (Print.aspx)
======================
<script language="javascript"> window.print(); </script>

For screen version it is best to use pixels to define size of fonts, tables, images etc., as you probably already do. But, for print version use points instead of pixels. Example:

body {   font: 12pt; }

Actually, we don't have to make separate page to prepare printing version. There is a way use only 1 page, but we can differentiate show-on-screen version and printing version by using CSS like this example

<LINK rel="stylesheet" href="style-for-screen.css" type="text/css" media="screen">
<LINK rel="stylesheet" href="style-for-print.css" type="text/css" media="print">

As you may notice, there is media attribute inside the LINK tag. Web browsers will use style-for-screen.css to show page on screen and style-for-print.css to print the page. For example, let say we want to hide <div id="menu"> in printing version, so in style-for-print.css we can add this code:

#menu {   display: none; }

Or if we don't want to have two separate CSS files, we can do it all in one file, like this :

@media print  {
    /*****   Styles for print   ******/
      h1, h2, h3 {color:black;}
      #navigation {display:none}
}
 
@media screen {
      /*****   Styles for screen  ******/
}

You can see the details on this Printing in ASP.NET article. All credits should go to the original poster of this article.

Friday, June 13, 2008

Using Sharepoint Web Controls (PeopleEditor and InputFormTextBox) in Microsoft Office Sharepoint Designer 2007

Recently, in my last project, I used SPD a lot. I want to share how to use sharepoint web controls ,especially PeopleEditor (used to select user/multiple users) and InputFormTextbox (used for Enhanced Rich Text).

To use Sharepoint  InputFormTextBox , just use this code in your SPD.

<SharePoint:InputFormTextBox ID="txtBxDetails" RichText="true"  RichTextMode="Compatible" runat="server" TextMode="MultiLine" Rows="10" Columns="10" ></SharePoint:InputFormTextBox>

The result will be like this

Sharepoint InputFormTextBox

To use Sharepoint  PeopleEditor , just use this code in your SPD.

<SharePoint:PeopleEditor id="peopleEditor" runat="server" IsValid="true" AllowEmpty="false" Height="20px" Width="200px" BackColor="Cornsilk" AllowTypeIn="true" MultiSelect="false" />

To enable multiple selection , just set MultiSelect property to true, false otherwise.
The result will be like this


Sharepoint PeopleEditor

Here are the sources if you want to see the details : InputFormTextBox and PeopleEditor

Tuesday, April 29, 2008

Accessing Infopath 2007 XML Data Source using Infopath Deserialization

Usually, if we want to access Infopath data source , we can use XPathNavigator class. Take a look of this example. Suppose we have infopath form with this data source.


This infopath form template have 2 data source :
- name , data type : text(string) , default value : Carlos
- age, data type : whole number (integer), default value : 25

You can use this code to get the value of name / age :
public void FormEvents_Loading(object sender, LoadingEventArgs e)
{
// Write your code here.
XPathNavigator root = MainDataSource.CreateNavigator();
XPathNavigator nameNode = root.SelectSingleNode("/my:myFields/my:Name", NamespaceManager);
EventLog.WriteEntry("InfopathTest", "The name is " + nameNode.Value);
}

The result :


I found a nice way to navigate the infopath data source using deserialization. You can read the details in the Patrick Tisseghem's article here

I modify the code a bit to be usable in this example. The first thing you have to do is save the infopath form as source files (Click File - Save as Source Files in the Infopath menubar) or just use WinZip / WinRAR / other software archiver to extract the xsn files.

Save it to your harddisk (ex : C:\temp\Infopath\sourcefiles). There are some files that will be extracted by Infopath like this picture below.

The only file you have to use is the myschema.xsd. Close your Infopath form (if you don't do this, the program cannot generate the class). Open Visual Studio command prompt and navigate to the path you selected before (in my example : C:\temp\Infopath\sourcefiles ) and run this code
XSD myschema.xsd /c


This command will generate .NET classes from the schema we provided (in C# by default). In this example it will generate a file named myschema.cs

Next step, add this class to your infopath code


Then use this code to retrieve the value of name / age.

public void FormEvents_Loading(object sender, LoadingEventArgs e)
{
// Write your code here.
XPathNavigator root = MainDataSource.CreateNavigator();
XPathNavigator node = root.SelectSingleNode("/my:myFields", NamespaceManager);
myFields mf = new myFields();
XmlSerializer xs = new XmlSerializer(typeof(myFields));
UTF8Encoding encoding = new UTF8Encoding();
byte[] fileBytes = encoding.GetBytes(node.OuterXml);
MemoryStream ms = new MemoryStream(fileBytes);
mf = (myFields)xs.Deserialize(ms);
EventLog.WriteEntry("InfopathTest", mf.Name + " is " + mf.Age + " years old");
}

don't forget to add these codes to the using section

using System.Xml.Serialization;
using System.IO;
using System.Text;

The result :


In my opinion, this is a nice and cool way to access Infopath data source. We don't have to care about any XPath query again. Feel free to give your comment here.

Wednesday, March 19, 2008

Write Microsoft Excel File in ASP .NET

As usual , I want to share my experience in my last project. The topic is how to write excel file in ASP .NET

1. Use Response object from System.Web
First, you have to make the content in HTML table code. Here is the example:

string filename = "myexcel.xls";
Response.Clear();
Response.Buffer = true;
Response.ContentType = "application/vnd.ms-excel";
Response.AddHeader("Content-Disposition", "inline;filename=" + filename);
Response.Charset = "";
this.EnableViewState = false;
Response.Write("<table border='1'><tr><th>test title</th><th>test title2</th></tr><tr><td>value1</td><td>value2</td></tr></table>");
Response.Flush();
Response.Close();

Here is the result if you execute this code


2. Another way to create excel file is using this class below( I forgot where I took this code. I will post the source URL as soon as I find it). Don't forget to add Microsoft Office 12.0 object library reference. Add this line of code to the using section

using Excel = Microsoft.Office.Interop.Excel;

Here is the class code :

class ExcelHelper
{
private Excel.Application _excelApplication;

public ExcelHelper()
{
_excelApplication = new Excel.Application();
}

public Excel.Workbook Create(string caption, string heading1)
{
try
{
_excelApplication.Caption = caption;
_excelApplication.ScreenUpdating = false;
_excelApplication.Visible = false;

Excel.Workbook book = _excelApplication.Workbooks.Add(Excel.XlSheetType.xlWorksheet);
Excel.Worksheet sheet = (Excel.Worksheet)book.ActiveSheet;

Excel.Range r = (Excel.Range)sheet.Cells[1, "A"];
r.Value2 = heading1;
r.EntireRow.Font.Bold = true;

return book;

}
catch (Exception ex)
{
throw (ex);
}
}

public void Close()
{
_excelApplication.ScreenUpdating = true;
_excelApplication.Visible = true;
_excelApplication.DisplayAlerts = true;

if (_excelApplication != null)
{
_excelApplication.Quit();
_excelApplication = null;
GC.Collect();
GC.WaitForPendingFinalizers();
GC.Collect();
GC.WaitForPendingFinalizers();
}
}
}

I will give two examples how to use this ExcelHelper class:
- First, this example will write cell A4 and B4 with "Parent Directory" and "Testing" and also make all the cell font bold.

ExcelHelper _eh = new ExcelHelper();
object _missing = System.Reflection.Missing.Value;
Excel.Workbook _book;
Excel.Worksheet _sheet;
Excel.Range _rng;
int _row = 4;
string caption = "Test Caption";
string heading1 = "Test Heading1";
_book = _eh.Create(caption, heading1);
_sheet = ((Excel.Worksheet)_book.ActiveSheet);

_rng = ((Excel.Worksheet)_book.ActiveSheet).get_Range("A4", "H3");
_rng.Font.Bold = true;
_rng.EntireRow.Font.Bold = true;

_sheet.Columns.ColumnWidth = 30;

_rng = (Excel.Range)_sheet.Cells[_row, "A"];
_rng.Value2 = "Parent Directory";
_rng = (Excel.Range)_sheet.Cells[_row, "B"];
_rng.Value2 = "Testing";

_eh.Close();

- Second, use this ExcelFileReport class (I took this code from someone's blog, I will post the source URL as soon as I find it)

public class ExcelFileReport
{
private object _missing;
private Excel.Workbook _book;
Excel.Worksheet _sheet;
Excel.Range _rng;
int _row;
private DirectoryInfo _di;
ExcelHelper _eh = new ExcelHelper();

public ExcelFileReport(DirectoryInfo di)
{
_di = di;
_missing = System.Reflection.Missing.Value;
_row = 4;
}

public void DocumentDirectory(DirectoryInfo di)
{
foreach (DirectoryInfo d in di.GetDirectories())
{
DocumentDirectory(d);
}

foreach (FileInfo f in di.GetFiles())
{
_row++;
_rng = (Excel.Range)_sheet.Cells[_row, "A"];
_rng.Value2 = di.Name;
_rng = (Excel.Range)_sheet.Cells[_row, "B"];
_rng.Value2 = f.FullName;
_rng = (Excel.Range)_sheet.Cells[_row, "C"];
_rng.Value2 = f.Name;
_rng = (Excel.Range)_sheet.Cells[_row, "D"];
_rng.Value2 = f.Length;
_rng = (Excel.Range)_sheet.Cells[_row, "E"];
_rng.Value2 = f.Extension;
_rng = (Excel.Range)_sheet.Cells[_row, "F"];
_rng.Value2 = f.LastWriteTime.ToLongDateString();
}
}

public void Generate()
{
string caption = "File Analysis Results";
string heading1 = "File Analysis Report for Folder " + _di.FullName;
_book = _eh.Create(caption, heading1);
_sheet = ((Excel.Worksheet)_book.ActiveSheet);
WriteTableHeader();
DocumentDirectory(_di);
SetAutoFilter();
_eh.Close();
}

private void SetAutoFilter()
{
string lastrow = "F" + _row.ToString();
_rng = ((Excel.Worksheet)_book.ActiveSheet).get_Range("A4", lastrow);
_rng.AutoFilter(1, _missing, Excel.XlAutoFilterOperator.xlAnd, _missing, true);
_rng.Borders.LineStyle = Excel.XlLineStyle.xlContinuous;
}

public void WriteTableHeader()
{
_rng = ((Excel.Worksheet)_book.ActiveSheet).get_Range("A4", "H3");
_rng.Font.Bold = true;
_rng.EntireRow.Font.Bold = true;

_rng = (Excel.Range)_sheet.Cells[_row, "A"];
_rng.Value2 = "Parent Directory";
_rng = (Excel.Range)_sheet.Cells[_row, "B"];
_rng.Value2 = "Full Path";
_rng = (Excel.Range)_sheet.Cells[_row, "C"];
_rng.Value2 = "File Name";
_rng = (Excel.Range)_sheet.Cells[_row, "D"];
_rng.Value2 = "Size";
_rng = (Excel.Range)_sheet.Cells[_row, "E"];
_rng.Value2 = "Type";
_rng = (Excel.Range)_sheet.Cells[_row, "F"];
_rng.Value2 = "Last Modified";

_sheet.Columns.ColumnWidth = 30;
}
}
And use this code to invoke the Generate method :

DirectoryInfo di = new DirectoryInfo(@"C:\Program Files\Microsoft Office\OFFICE12\1033");
ExcelFileReport efr = new ExcelFileReport(di);
efr.Generate();

Please remind that these two examples will run Microsoft Excel and "Do you want to save" dialog will pop up. Therefore you must have Microsoft Excel installed in the PC you want to execute this code. Here is the result if you execute the last code

If you have any suggestion or have better and optimized code, please put your comment. Any suggestion will be appreciated.

Friday, January 25, 2008

MOSS 2007 Tips and Trick January 2008

Here are some MOSS 2007 tips I want to share from my previous experience.
Problem : How to insert / update a list item without write permission

You can use this code

SPSecurity.RunWithElevatedPrevileges(delegate(){
//place your code here
});

Your code above will be executed using admin rights. So you can insert / update a list item even though current login doesn't have permission to insert / update.

Note:
Remind that you cannot call method Update of SPListItem class inside the code above. It will throw error like this : "Operation is not valid due to the current state of the object".

I have googled about this problem and found a way to solve it, thanks to this great post.
The point is :You must not call the SPListItem.Update inside the RunWithElevatedPrivileges block. Instead you should only instantiate the SPSite or SPWeb there and call Update afterwards.

Here is the sample code :


SPSite site = new SPSite("http://moss.denallix.com");
SPWeb elevatedRootWeb = null;
SPWeb web = site.OpenWeb();
SPSecurity.RunWithElevatedPrivileges(delegate()
{
using (SPSite elevatedSite = new SPSite(web.Site.ID))
{
elevatedRootWeb = elevatedSite.RootWeb;
}
});
SPList myList = elevatedRootWeb.Lists["MyList"];
try
{
elevatedRootWeb.AllowUnsafeUpdates = true;
SPListItem myNewItem = myList.Items.Add();
myNewItem["Column1"] = "Column1Value";
myNewItem["Column2"] = "Column2Value";
myNewItem["Column3"] = "Column3Value";
myNewItem.Update();
}
catch (Exception ex)
{
EventLog.WriteEntry("Error", ex.Message.ToString(), EventLogEntryType.Error);
}


MOSS 2007 Tips : Dynamic Webpart Installer Class

Usually when we deploy a web part to MOSS , we have to develop 2 times. One for the installer class , one for the user control (ASCX) itself. A friend of mine has made a dynamic installer class so that we just have to set the ASCX path every time we want to make a web part. Here is the code.


using System;
using System.Collections.Generic;
using System.Text;
using System.Web;
using System.Web.UI;
using System.Web.UI.WebControls;
using System.Web.UI.WebControls.WebParts;

namespace DynamicUserControlWebPart
{
public class DynamicUserControlWebPart : WebPart
{
private string _usercontrolvirtualpath;
private string ErrorMessage;
Control _control = null;

[WebBrowsable(true)]
[Personalizable(true)]
[WebDescription("Dynamic User Control WebPart")]
[WebDisplayName("Dynamic User Control WebPart")]
public string UserControlVirtualPath
{
get { return _usercontrolvirtualpath; }
set { _usercontrolvirtualpath = value; }
}

protected override void CreateChildControls()
{
this.Controls.Clear();
try
{
_control = this.Page.LoadControl(_usercontrolvirtualpath);
this.Controls.Add(_control);
}
catch (System.Exception ex)
{
ErrorMessage = ex.Message;
}
}

protected override void RenderChildren(HtmlTextWriter writer)
{
if (_control != null)
{
_control.RenderControl(writer);
}
else
{
writer.Write(ErrorMessage);
}
}
}
}


- Deploy this Web Part.
- Place your *.ASCX and *.ASCX.CS files in the moss folder (ex: C:\Inetpub\wwwroot\wss\VirtualDirectories\81\MyUserControl ).
- After adding this webpart to a page , just click Edit - Modify Shared Web Part.
- And then set the ASCX path to the property in the right column , Miscellaneous category. (ex : ~/MyUserControl/myUC.ascx )
- See the result.

Monday, January 14, 2008

Microsoft Infopath 2007 Tips And Trick January 14, 2008

In my last project, I use Microsoft Infopath 2007 intensively. In the beginning, I have difficulties in navigating Microsoft Infopath 2007 data source because all data is stored in XML. Here are the codes I often use when dealing with Infopath.

Most of my codes use XPathNavigator class, so don't forget to add this reference in the using section.I assume you place this code in Infopath code( example : in Form Load event)

using System.Xml;
using System.Xml.XPath;

Common problem #1 : Get Microsoft Infopath 2007 Data Source XML value
Suppose you have a data source like this :
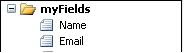
To get the value of name, you can use this code.

XPathNavigator root = MainDataSource.CreateNavigator();
XPathNavigator nameNode = root.SelectSingleNode("/my:myFields/my:Name",NamespaceManager);

string name = nameNode.Value;

note : the parameter in SelectSingleNode method is a XPath query. You can get this by right-clicking the data source you want, click "Copy XPath"

Common problem #2 : Set A Microsoft Infopath 2007 Data Source XML Value
Suppose you want to set the name to a value "newvalue". You can use this code.

XPathNavigator root = MainDataSource.CreateNavigator();
XPathNavigator nameNode = root.SelectSingleNode("/my:myFields/my:Name",NamespaceManager);

nameNode.SetValue("newvalue");
Common problem #3 : Loop through a repeating table in Microsoft Infopath 2007
Suppose you have a data source like this
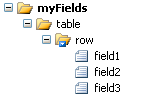
Then , to get the value of field1, field2, and field3 iteratively, use this code.

XPathNavigator domNav = MainDataSource.CreateNavigator();
XPathNodeIterator rows = domNav.Select("/my:myFields/my:table/my:row", NamespaceManager);

while (rows.MoveNext())
{
string field1 = rows.Current.SelectSingleNode("my:field1", NamespaceManager).Value;
string field2 = rows.Current.SelectSingleNode("my:field2", NamespaceManager).Value;
string field3 = rows.Current.SelectSingleNode("my:field3", NamespaceManager).Value;
}
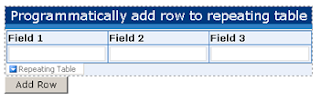
Common problem #4 : Add a row to Microsoft Infopath 2007 repeating table

If you have a repeating table like thiswith this data source
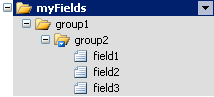
You can add a row to this repeating table by using this code.

string myNamespace = NamespaceManager.LookupNamespace("my");
using (XmlWriter writer = MainDataSource.CreateNavigator().SelectSingleNode(
"/my:myFields/my:group1", NamespaceManager).AppendChild())
{
writer.WriteStartElement("group2", myNamespace);
writer.WriteElementString("field1", myNamespace, "Cell 1");
writer.WriteElementString("field2", myNamespace, "Cell 2");
writer.WriteElementString("field3", myNamespace, "Cell 3");
writer.WriteEndElement();
writer.Close();
}
Article #3 was taken from this great site . Article #4 was taken from the another great site.

Note that NamespaceManager is a property which exists only in Infopath code. To use these code in another place, such as K2 Blackpearl, you have to define the NamespaceManager by yourself. You can use this method.

public XmlNamespaceManager InitNamespaceManager(XmlDocument xmlDOMDoc)
{
XmlNamespaceManager xnmMan;
xnmMan = new XmlNamespaceManager(xmlDOMDoc.NameTable);
foreach (XmlAttribute nsAttr in xmlDOMDoc.DocumentElement.Attributes)
{
if (nsAttr.Prefix=="xmlns")
xnmMan.AddNamespace(nsAttr.LocalName,nsAttr.Value);
}
return xnmMan;
}
and use this code to create your NamespaceManager ( I assume you use K2 Blackpearl and Microsoft Infopath 2007)

XmlDocument doc = new XmlDocument();
string xmlString = K2.ProcessInstance.XmlFields["MyInfopathForm"].Value;
doc.LoadXml(xmlString);
XmlNamespaceManager NamespaceManager = InitNamespaceManager(doc);

I took this code from this great blog.
All credits should go to the original poster.

Hope this article helps:)