Thursday, June 19, 2008

Fish & Co Buy 1 Get 1 Free Promotion June 2008

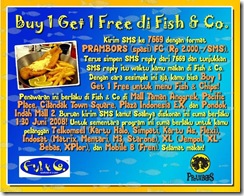
FYI , Fish & Co Jakarta have a promotion in June 2008 Buy 1 Get 1 Free for Fish n Chips menu. The details can be seen in this Prambors news or the picture below.

fishnco

Today, my honey and I have tried this promotion in Fish n Co Mall Taman Anggrek. We ordered 2 Fish n Chips (with rice/ chips) for Rp 55.000, 1 Ice Blackcurrant Tea (free flow) for Rp 19.000, and 1 Ice Lemon Tea (free flow) for Rp 19.000 (excluding 10% tax and 5,5% service charge). The fish meat was big enough and delicious. It's rather expensive (I spent Rp 108.000) but really worth it :)

If you want to try this promotion, don't forget it will last until the end of June 2008 only :)

Wednesday, June 18, 2008

Install Apache, Mysql, PHP, and PHPMyAdmin Tutorial

I found a good article to install apache, mysql, PHP, and PHPMyAdmin in this Install Apache PHP MySQL and phpMyAdmin on Windows article

You can follow the instructions there. And don't forget to copy all of your PHP extensions DLL in C:\php\ext directory (if you follow the tutorial completely, the directory may be different if you customize it)

If you want to customize the settings, such as listening in another port (default is 80) or placing the *.php files in C:\PHP, you can check this Install Apache PHP MySQL article

Tuesday, June 17, 2008

Printing a Web Page

I found a useful article to print a web page. The fastest and simplest solution is using javascript window.print()

<input type="button" value="Print" onclick="window.print();">

If you click this button , it will show this print dialog
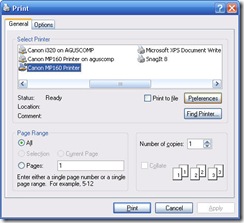
printdialog

This example will print the entire web page,including the print button and anything else. To get better result, we can make two versions of web page, one for showing on screen and the other one for printing

On Screen 1
===========
<input type="button" value="Print" onclick="window.open("Print.aspx");">

On Screen 2 (Print.aspx)
======================
<script language="javascript"> window.print(); </script>

For screen version it is best to use pixels to define size of fonts, tables, images etc., as you probably already do. But, for print version use points instead of pixels. Example:

body {   font: 12pt; }

Actually, we don't have to make separate page to prepare printing version. There is a way use only 1 page, but we can differentiate show-on-screen version and printing version by using CSS like this example

<LINK rel="stylesheet" href="style-for-screen.css" type="text/css" media="screen">
<LINK rel="stylesheet" href="style-for-print.css" type="text/css" media="print">

As you may notice, there is media attribute inside the LINK tag. Web browsers will use style-for-screen.css to show page on screen and style-for-print.css to print the page. For example, let say we want to hide <div id="menu"> in printing version, so in style-for-print.css we can add this code:

#menu {   display: none; }

Or if we don't want to have two separate CSS files, we can do it all in one file, like this :

@media print  {
    /*****   Styles for print   ******/
      h1, h2, h3 {color:black;}
      #navigation {display:none}
}
 
@media screen {
      /*****   Styles for screen  ******/
}

You can see the details on this Printing in ASP.NET article. All credits should go to the original poster of this article.
Friday, June 13, 2008

Using Sharepoint Web Controls (PeopleEditor and InputFormTextBox) in Microsoft Office Sharepoint Designer 2007

Recently, in my last project, I used SPD a lot. I want to share how to use sharepoint web controls ,especially PeopleEditor (used to select user/multiple users) and InputFormTextbox (used for Enhanced Rich Text).

To use Sharepoint  InputFormTextBox , just use this code in your SPD.

<SharePoint:InputFormTextBox ID="txtBxDetails" RichText="true"  RichTextMode="Compatible" runat="server" TextMode="MultiLine" Rows="10" Columns="10" ></SharePoint:InputFormTextBox>

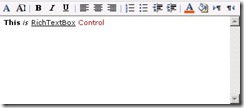
The result will be like this

Sharepoint InputFormTextBox

To use Sharepoint  PeopleEditor , just use this code in your SPD.

<SharePoint:PeopleEditor id="peopleEditor" runat="server" IsValid="true" AllowEmpty="false" Height="20px" Width="200px" BackColor="Cornsilk" AllowTypeIn="true" MultiSelect="false" />

To enable multiple selection , just set MultiSelect property to true, false otherwise.
The result will be like this


Sharepoint PeopleEditor

Here are the sources if you want to see the details : InputFormTextBox and PeopleEditor